
Why You’ll Love This Recipe
This recipe combines creamy cheesecake filling with a crisp shell and a fruity crunch coating. It is easy to assemble, visually appealing, and highly customizable. The balance of sweetness, creaminess, and texture makes it suitable for both casual treats and special occasions.
Print
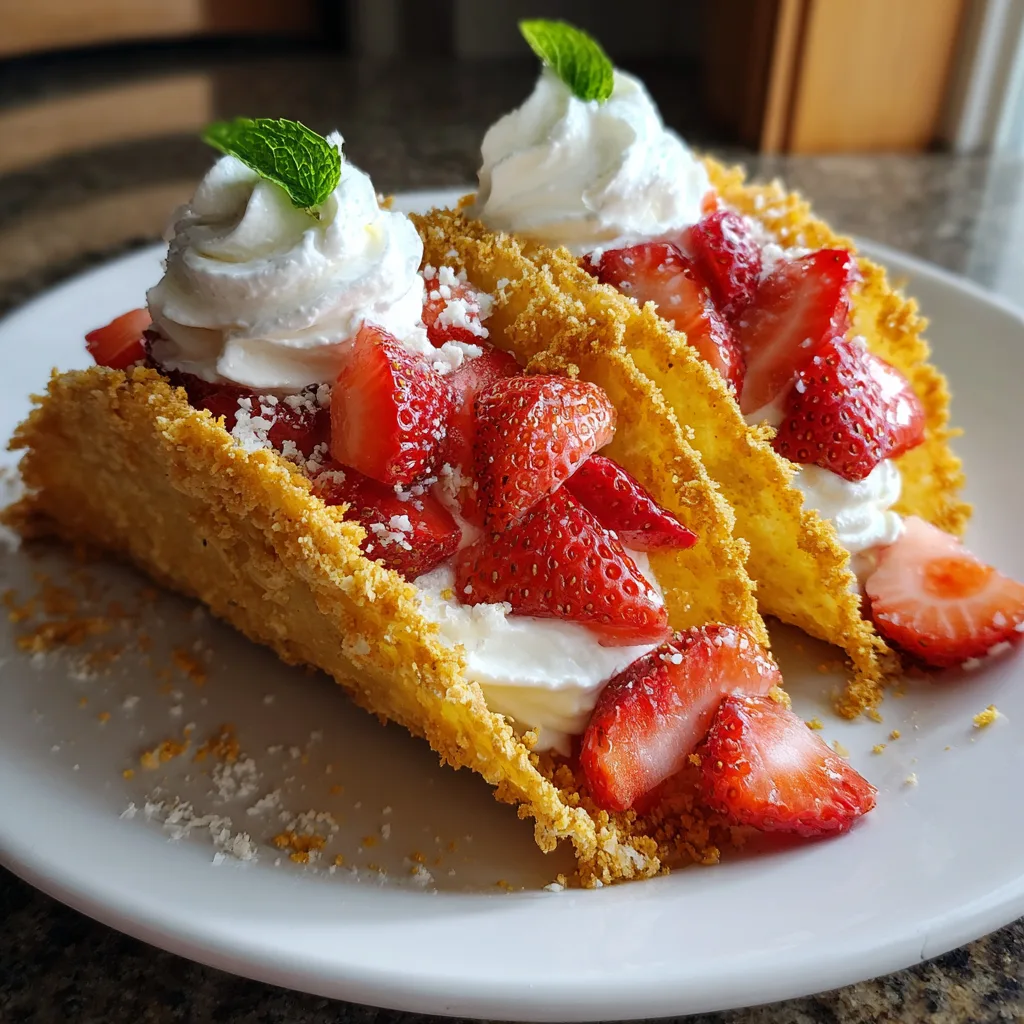
Strawberry Crunch Cheesecake Tacos: A Creamy Dessert with a Crisp, Fruity Finish
- Total Time: 30 mins
- Yield: 6 cheesecake tacos
- Diet: Vegetarian
Description
Crispy dessert tacos filled with creamy cheesecake filling and coated in a sweet strawberry crunch topping inspired by the classic strawberry shortcake ice cream bars.
Ingredients
- 6 small flour tortillas
- 2 tbsp butter, melted
- 1/4 cup sugar
- 1 tsp cinnamon
- 1 cup crushed golden Oreos
- 1 cup freeze-dried strawberries, crushed
- 3 tbsp melted butter (for crunch coating)
- 8 oz cream cheese, softened
- 1/2 cup powdered sugar
- 1 tsp vanilla extract
- 1 cup heavy whipping cream
- Fresh strawberries, diced (optional)
Instructions
- Preheat oven to 350°F (175°C). Brush tortillas with melted butter, then sprinkle with the sugar–cinnamon mixture.
- Drape tortillas over the oven rack bars or a taco mold to form taco shapes. Bake for 8–10 minutes until crisp. Let cool.
- In a bowl, combine crushed golden Oreos, crushed freeze-dried strawberries, and melted butter until coarse crumbs form. Set aside.
- In a mixing bowl, beat cream cheese, powdered sugar, and vanilla until smooth.
- In a separate bowl, whip heavy cream to stiff peaks. Fold into the cream cheese mixture to make the cheesecake filling.
- Fill each taco shell with cheesecake filling using a piping bag or spoon.
- Dip or sprinkle the tops of the filled tacos with the strawberry crunch mixture.
- Top with fresh diced strawberries if desired and chill until ready to serve.
Notes
- For extra firmness, refrigerate taco shells for 10 minutes after baking.
- Use a torch to lightly warm and crisp the crunch coating for added texture.
- You can substitute freeze-dried raspberries for a tangier crunch.
- Prep Time: 20 mins
- Cook Time: 10 mins
- Category: Dessert
- Method: Baking
- Cuisine: American
Ingredients
(Tip: You can find the complete list of ingredients and their measurements in the recipe card below.)
Cream cheese forms the base of the cheesecake filling. When softened, it blends smoothly and provides the rich, tangy flavor associated with classic cheesecake.
Powdered sugar sweetens the filling while maintaining a light, smooth texture. Its fine consistency ensures there is no graininess in the finished cream.
Vanilla extract adds warmth and depth, enhancing the overall flavor without overpowering the strawberry notes.
Heavy cream is whipped and folded into the mixture to lighten the filling. This step creates a mousse-like consistency that works well in a handheld dessert.
Crunchy taco shells provide structure and contrast. Their crisp texture supports the creamy filling and holds up well when assembled shortly before serving.
Melted butter coats the taco shells and helps the crunch topping adhere. It also adds richness and enhances flavor.
Strawberry sandwich cookies create the signature strawberry crunch coating. When crushed, they provide color, sweetness, and texture.
Freeze-dried strawberries intensify the strawberry flavor and add a natural fruit note to the crunch coating.
White chocolate drizzle adds sweetness and a polished finish, complementing the strawberry flavor without overwhelming it.
Directions
Begin by beating the cream cheese in a mixing bowl until completely smooth. Add the powdered sugar and vanilla extract, mixing until fully combined and creamy.
In a separate bowl, whip the heavy cream until soft peaks form. Gently fold the whipped cream into the cream cheese mixture, taking care to preserve its light texture. Refrigerate the filling briefly to allow it to firm up.
Brush the taco shells lightly with melted butter. In a shallow bowl, combine the crushed strawberry cookies and freeze-dried strawberries. Roll or sprinkle the shells with the mixture, pressing gently so the coating adheres evenly.
Transfer the chilled cheesecake filling into a piping bag or use a spoon to fill each shell generously. Ensure even distribution for balanced flavor in every bite.
Finish by drizzling white chocolate over the filled tacos. Serve immediately for maximum crunch or chill briefly before serving if needed.
Equipment needed :
Here’s what you’ll want to have on hand:
Silicone Spatula – Durable, heat-resistant silicone spatula perfect for mixing, scraping, and spreading. Gentle on non-stick cookware and easy to clean.
Large pot – You’ll need this to boil the whole cabbage head and soften the leaves.
large bowl –Spacious, durable large bowl ideal for mixing, serving, or food preparation. Made from sturdy material and easy to clean.
Sharp knife – For coring the cabbage and slicing out the thick stem in each leaf. A paring knife works best.
Mixing bowl – A big bowl makes it easier to combine your meat and rice filling evenly.
Cutting board – For prepping cabbage leaves and rolling them like a pro.
9×13-inch baking dish – Ideal size to fit your rolled cabbage leaves snugly and prevent them from unraveling.
knife – A sharp, durable kitchen knife perfect for slicing, chopping, and dicing with ease
Servings and timing
This recipe makes approximately 8 strawberry crunch cheesecake tacos. Preparation time is about 25 minutes, with an optional chilling time of 15 minutes. No baking is required.
Storage/reheating
These tacos are best enjoyed fresh. If necessary, store assembled tacos in the refrigerator for up to one day, noting that the shells may soften slightly. Reheating is not recommended.

Variations and Customizations
Chocolate Strawberry Cheesecake Tacos
Add melted chocolate to the filling for a richer flavor.
Fresh Strawberry Filling
Fold finely chopped fresh strawberries into the cheesecake mixture.
Strawberry Lemon Version
Add lemon zest to brighten the filling and enhance the fruit flavor.
Cookies and Cream Twist
Replace strawberry cookies with vanilla sandwich cookies and add strawberry drizzle.
Mini Dessert Tacos
Use smaller shells for bite-sized portions.
Milk Chocolate Finish
Substitute white chocolate drizzle with milk chocolate for a deeper sweetness.
Nut-Free Crunch Option
Use only cookies and freeze-dried fruit for a safe, nut-free topping.
Low-Sugar Variation
Reduce powdered sugar and use low-sugar cookies if desired.
Pink-Themed Party Tacos
Decorate with pink chocolate drizzle for themed events.
Layered Filling Style
Pipe strawberry compote into the center of the cheesecake filling for added depth.
FAQs
Can I make these tacos ahead of time?
They are best assembled shortly before serving to maintain crunch.
Do I need to bake anything?
No baking is required for this recipe.
Can I use low-fat cream cheese?
Yes, though the filling may be slightly less rich.
How do I keep the shells crisp?
Assemble close to serving time and avoid overfilling.
Can I freeze the cheesecake filling?
Yes, the filling can be frozen separately and thawed before use.
Are freeze-dried strawberries necessary?
They enhance flavor but can be omitted if unavailable.
Conclusion
Strawberry crunch cheesecake tacos are a visually appealing and flavorful dessert that combines creamy filling, crisp shells, and vibrant strawberry crunch. With minimal preparation and endless customization options, this recipe is ideal for entertaining or adding a playful twist to classic cheesecake flavors. It is a dessert that delivers both texture and taste in every bite.
Hungry for more? Visit our website for full recipes and follow us on Pinterest for daily foodie inspo you’ll love to pin!