
introduction
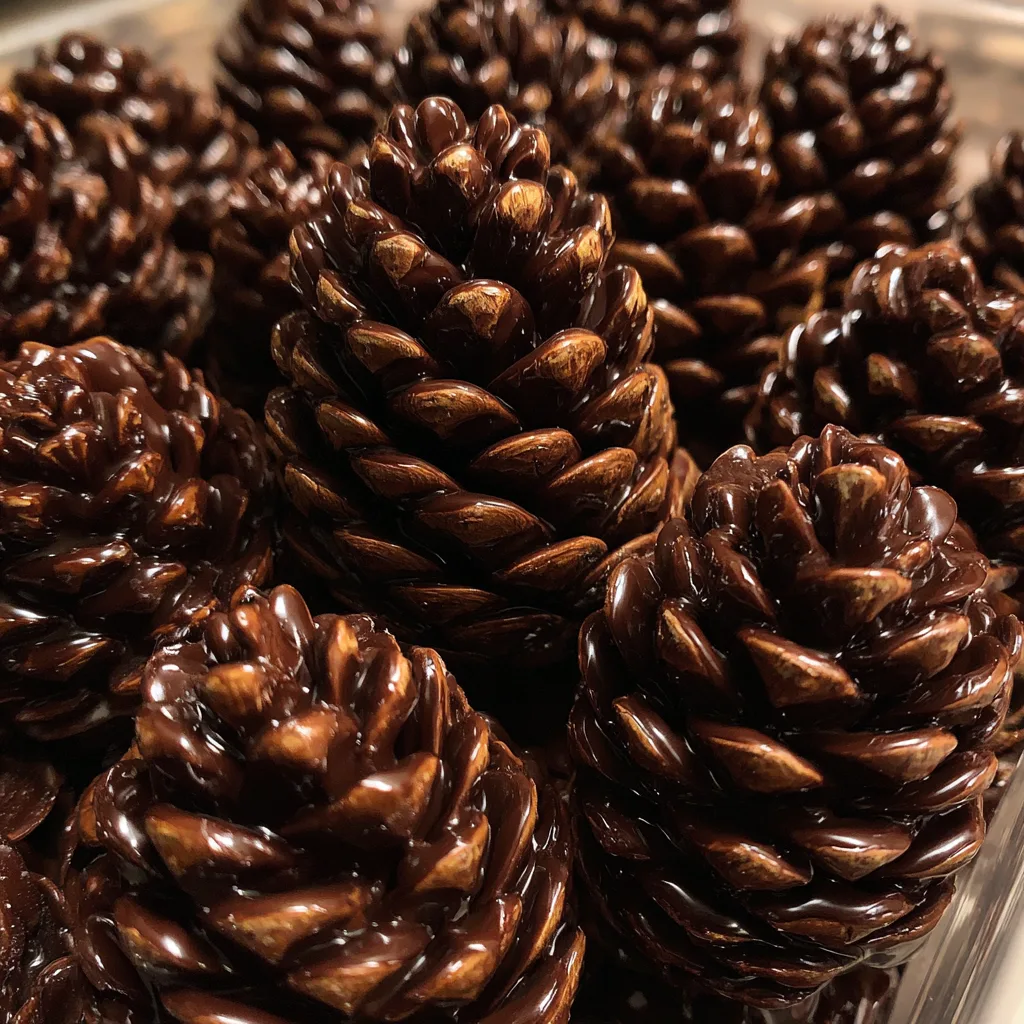
Chocolate almond pinecones are one of those desserts that instantly capture attention before anyone even tastes them. Shaped like miniature pinecones and coated with sliced almonds, they look charmingly festive and surprisingly realistic. I first made these during the holiday season when I wanted a dessert that felt playful yet elegant, and they quickly became a favorite. Not only are they visually striking, but they are also rich, chocolatey, and incredibly satisfying.

Chocolate Almond Pinecones – A Whimsical No-Bake Holiday Treat
- Total Time: 30 minutes
- Yield: 10 pinecones
- Diet: Vegetarian
Description
Chocolate almond pinecones are a fun no-bake treat made with crunchy cereal, chocolate, almond butter, and powdered sugar, shaped to look like festive pinecones.
Ingredients
- 200 g dark chocolate
- 1/2 cup almond butter
- 3 cups chocolate-flavored cornflake cereal
- 1/4 cup powdered sugar (for dusting)
- 1 teaspoon vanilla extract
- Pinch of salt
Instructions
- Melt the dark chocolate gently using a double boiler or microwave.
- Stir almond butter, vanilla extract, and salt into the melted chocolate until smooth.
- Let the mixture cool slightly, then gently fold in the cornflake cereal, coating evenly.
- Using a spoon, shape small portions into pinecone shapes on a parchment-lined tray.
- Refrigerate for 20–30 minutes until firm.
- Before serving, dust lightly with powdered sugar to resemble snow.
Notes
- Handle gently when shaping to avoid breaking the cereal.
- Store in an airtight container in the refrigerator.
- You may use milk or vegan chocolate depending on preference.
- Prep Time: 20 minutes
- Cook Time: 0 minutes
- Category: Dessert
- Method: No-Bake
- Cuisine: International
What makes this recipe especially appealing is how simple it is. There is no baking involved, no complicated techniques, and very little cleanup. The chocolate base is smooth and indulgent, while the almonds add texture and a gentle nutty flavor that balances the sweetness. These pinecones are perfect for holiday dessert tables, edible gifts, or a fun project to make with family. They prove that a creative presentation can transform simple ingredients into something truly memorable.
Why You’ll Love This Recipe
This recipe is no-bake, creative, and festive. It uses simple ingredients, comes together easily, and results in a dessert that looks impressive while remaining approachable and delicious.
Ingredients
(Tip: You can find the complete list of ingredients and their measurements in the recipe card below.)
Chocolate cookies
Chocolate cookies form the base of the pinecones, providing structure and deep cocoa flavor.
Cream cheese
Cream cheese binds the cookie crumbs together and adds a smooth, creamy texture.
Cocoa powder
Cocoa powder enhances the chocolate flavor and gives the mixture richness and depth.
Powdered sugar
Powdered sugar sweetens the mixture while keeping it smooth and easy to shape.
Vanilla extract
Vanilla adds warmth and rounds out the chocolate flavor.
Sliced almonds
Sliced almonds are used to decorate the pinecones, creating the signature layered look and adding crunch.
Powdered sugar for dusting
Powdered sugar is optional and adds a snow-like finish for a festive touch.
Directions
Begin by crushing the chocolate cookies into fine crumbs using a food processor. Transfer the crumbs to a mixing bowl and add the cream cheese, cocoa powder, powdered sugar, and vanilla extract. Mix until the mixture is smooth and holds together easily.
Scoop portions of the mixture and shape them into small oval or cone-like forms, resembling pinecones. Place them on a parchment-lined tray and refrigerate briefly to firm up.
Once chilled, decorate each pinecone by gently pressing sliced almonds into the surface, starting from the bottom and working upward in overlapping layers to mimic pinecone scales.
Return the finished pinecones to the refrigerator to set completely. Before serving, lightly dust with powdered sugar if desired.
Equipment Needed
Must-Have Tools to Get Rolling
Here’s what you’ll want to have on hand:
Silicone Spatula – Durable, heat-resistant silicone spatula perfect for mixing, scraping, and spreading. Gentle on non-stick cookware and easy to clean.
Large pot – You’ll need this to boil the whole cabbage head and soften the leaves.
large bowl –Spacious, durable large bowl ideal for mixing, serving, or food preparation. Made from sturdy material and easy to clean.
Sharp knife – For coring the cabbage and slicing out the thick stem in each leaf. A paring knife works best.
Mixing bowl – A big bowl makes it easier to combine your meat and rice filling evenly.
Cutting board – For prepping cabbage leaves and rolling them like a pro.
9×13-inch baking dish – Ideal size to fit your rolled cabbage leaves snugly and prevent them from unraveling.
knife – A sharp, durable kitchen knife perfect for slicing, chopping, and dicing with ease.
Servings and Timing
This recipe makes approximately 10 to 12 chocolate almond pinecones. Preparation takes about 25 minutes, and chilling time is approximately 30 minutes. Total time is around 55 minutes.
Storage and Reheating
Store chocolate almond pinecones in an airtight container in the refrigerator for up to five days. These treats are served chilled and do not require reheating.
Variations and Customizations
Chocolate almond pinecones are easy to customize. Dark chocolate cookies can be used for a richer flavor, or a splash of almond extract can be added for enhanced nuttiness. Crushed nuts can be mixed into the base for added texture. For a festive twist, roll the base mixture in coconut flakes before decorating. These variations allow you to personalize the recipe while keeping its signature look intact.
Nutrition and Dietary Info
These pinecones are a rich, indulgent treat made with chocolate, nuts, and cream cheese. They are vegetarian-friendly and best enjoyed in moderation as a special-occasion dessert.
Expert Tips & Customizations
Chill before decorating
Firm shapes make it easier to attach the almonds neatly.
Work patiently
Placing almonds carefully improves the pinecone appearance.
Use uniform almond slices
Even slices create a cleaner, more realistic look.
FAQs
Are chocolate almond pinecones baked?
No, this is a completely no-bake recipe.
Can I make these ahead of time?
Yes, they can be prepared several days in advance.
Do I need a food processor?
It is recommended, but finely crushing cookies by hand also works.
Can I freeze these pinecones?
Yes, freeze in an airtight container for up to one month.
What cookies work best?
Chocolate sandwich or plain chocolate cookies work well.
Can I use a different nut?
Yes, sliced hazelnuts or pine nuts can be used creatively.
Are these very sweet?
They are balanced with cocoa and cream cheese.
Can kids help make these?
Yes, shaping and decorating is kid-friendly.
How do I keep almonds from falling off?
Press gently into chilled mixture for better adhesion.
Is powdered sugar necessary?
No, it is optional and purely decorative.
Conclusion
Chocolate almond pinecones are a delightful combination of creativity and indulgence. With their festive appearance, rich chocolate flavor, and simple preparation, they are a standout dessert for holidays and special occasions. Easy to make and fun to decorate, this recipe is proof that no-bake treats can be just as impressive as traditional desserts, making it one you will enjoy returning to year after year.
Hungry for more? Visit our website for full recipes and follow us on Pinterest for daily foodie inspo you’ll love to pin!