
Introduction
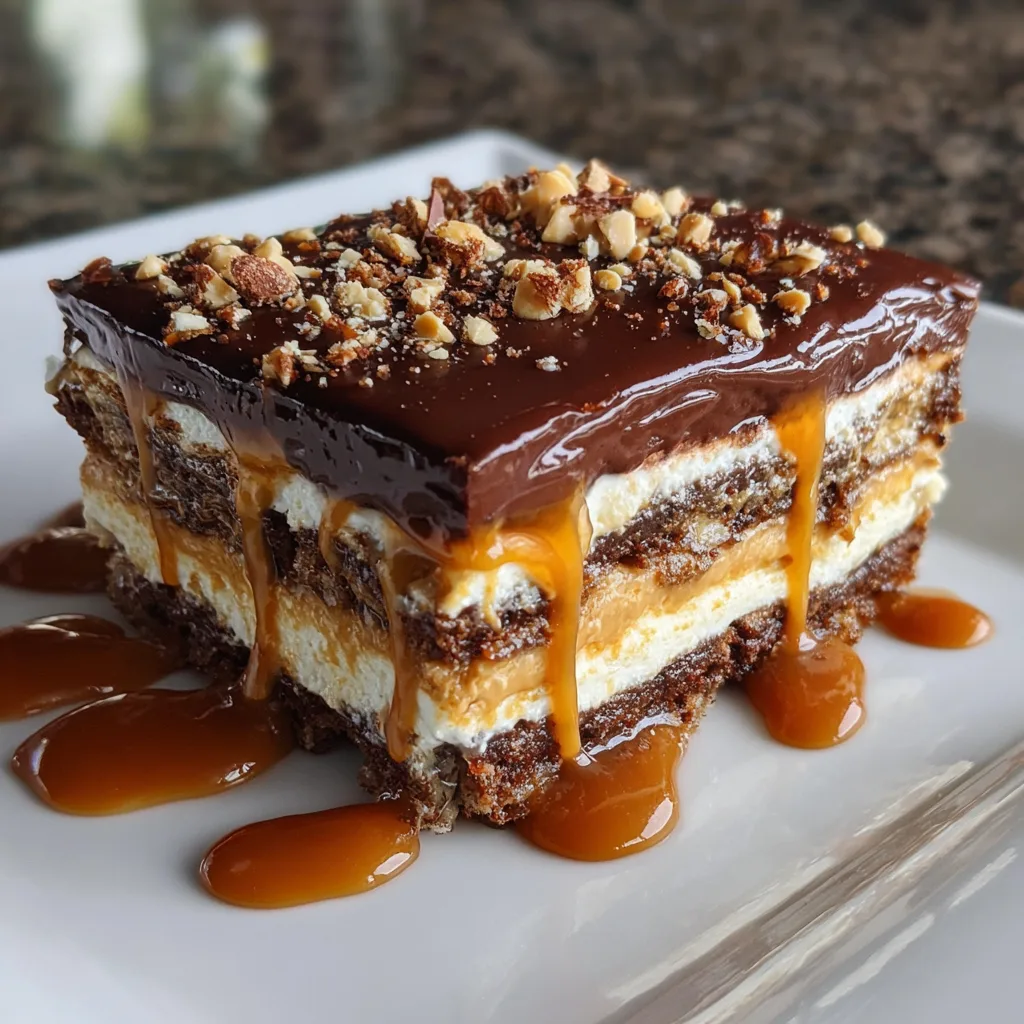
If you are searching for a decadent dessert that requires no oven time, this No-Bake Chocolate Peanut Butter Lasagna is the perfect treat. With layers of chocolate, creamy peanut butter filling, and a crunchy cookie crust, this dessert delivers a rich combination of flavors and textures that is incredibly satisfying. It is the type of dessert that looks impressive when served but is surprisingly simple to prepare.
I first made this recipe during the summer when turning on the oven was the last thing I wanted to do. The layered combination of chocolate and peanut butter immediately became a favorite in my kitchen. The smooth peanut butter cream contrasts beautifully with the chocolate layers, while the cookie base adds just the right amount of crunch.
Another great thing about this dessert is that it can be made ahead of time. Once chilled, the layers set beautifully, making it easy to slice and serve at gatherings, parties, or family dinners. If you love the classic chocolate and peanut butter combination, this dessert will quickly become a go-to favorite.
Print
No-Bake Chocolate Peanut Butter Lasagna – The Irresistible Layered Dessert Everyone Craves
- Total Time: 4 hours 20 minutes
- Yield: 12 servings
- Diet: Vegetarian
Description
No Bake Chocolate Peanut Butter Lasagna is a layered dessert made with a chocolate cookie crust, creamy peanut butter filling, chocolate pudding, and whipped topping for a rich and indulgent no-bake treat.
Ingredients
- 2 cups chocolate sandwich cookies, crushed
- 1/2 cup (115 g) unsalted butter, melted
- 1 cup (250 g) cream cheese, softened
- 1 cup creamy peanut butter
- 1 cup powdered sugar
- 2 cups whipped topping
- 2 cups cold milk
- 2 packages (3.9 oz each) instant chocolate pudding mix
- 1 cup mini chocolate chips
- 1/4 cup chopped peanuts (optional)
Instructions
- In a bowl mix the crushed chocolate cookies with melted butter until combined.
- Press the mixture firmly into the bottom of a 9×13-inch dish to form the crust. Chill for 10–15 minutes.
- In a large bowl beat cream cheese, peanut butter, and powdered sugar until smooth.
- Fold in 1 cup of whipped topping and spread the mixture evenly over the chilled crust.
- In another bowl whisk together the chocolate pudding mix and cold milk for about 2 minutes until thickened.
- Spread the pudding layer over the peanut butter layer.
- Top with the remaining whipped topping and spread evenly.
- Sprinkle mini chocolate chips and chopped peanuts over the top.
- Refrigerate for at least 4 hours or until set before slicing and serving.
Notes
- Chill the dessert well so the layers hold together when sliced.
- You can substitute crushed chocolate graham crackers or Oreo cookies for the crust.
- Drizzle melted chocolate or peanut butter on top for extra flavor.
- Store covered in the refrigerator for up to 4 days.
- Prep Time: 20 minutes
- Cook Time: 0 minutes
- Category: Dessert
- Method: No-Bake
- Cuisine: American
Why You’ll Love This Recipe
This dessert requires no baking, which makes it perfect for warm weather or when you want a quick and easy treat.
The combination of chocolate and peanut butter is a classic pairing that creates a rich, indulgent flavor in every bite.
Another reason to love this recipe is its beautiful layered presentation. Each slice reveals distinct layers that look impressive on the dessert table.
It is also an excellent make-ahead dessert. Preparing it several hours in advance allows the layers to set properly and makes serving effortless.
Finally, the recipe uses simple ingredients that are easy to find, making it accessible for home cooks of all skill levels.
Ingredients
(Tip: You can find the complete list of ingredients and their measurements in the recipe card below.)
Chocolate sandwich cookies form the base layer of this dessert. When crushed and combined with butter, they create a rich and slightly crunchy crust.
Unsalted butter helps bind the crushed cookies together to create a firm base that holds the dessert layers.
Cream cheese creates the creamy foundation of the peanut butter layer. It adds smoothness and a slight tang that balances the sweetness.
Peanut butter delivers the signature nutty flavor that defines this dessert. Creamy peanut butter works best for a smooth filling.
Powdered sugar sweetens the peanut butter layer while maintaining a soft, creamy texture.
Whipped topping adds lightness to the filling and helps create a fluffy texture that contrasts with the dense crust.
Instant chocolate pudding mix forms the rich chocolate layer in the dessert. It adds deep chocolate flavor and smooth texture.
Cold milk is used to prepare the pudding layer and helps it set properly.
Chocolate chips add extra bursts of chocolate flavor and can be sprinkled between layers or on top.
Chopped peanut butter cups provide additional peanut butter flavor and a slightly chewy texture that enhances the dessert.
Directions
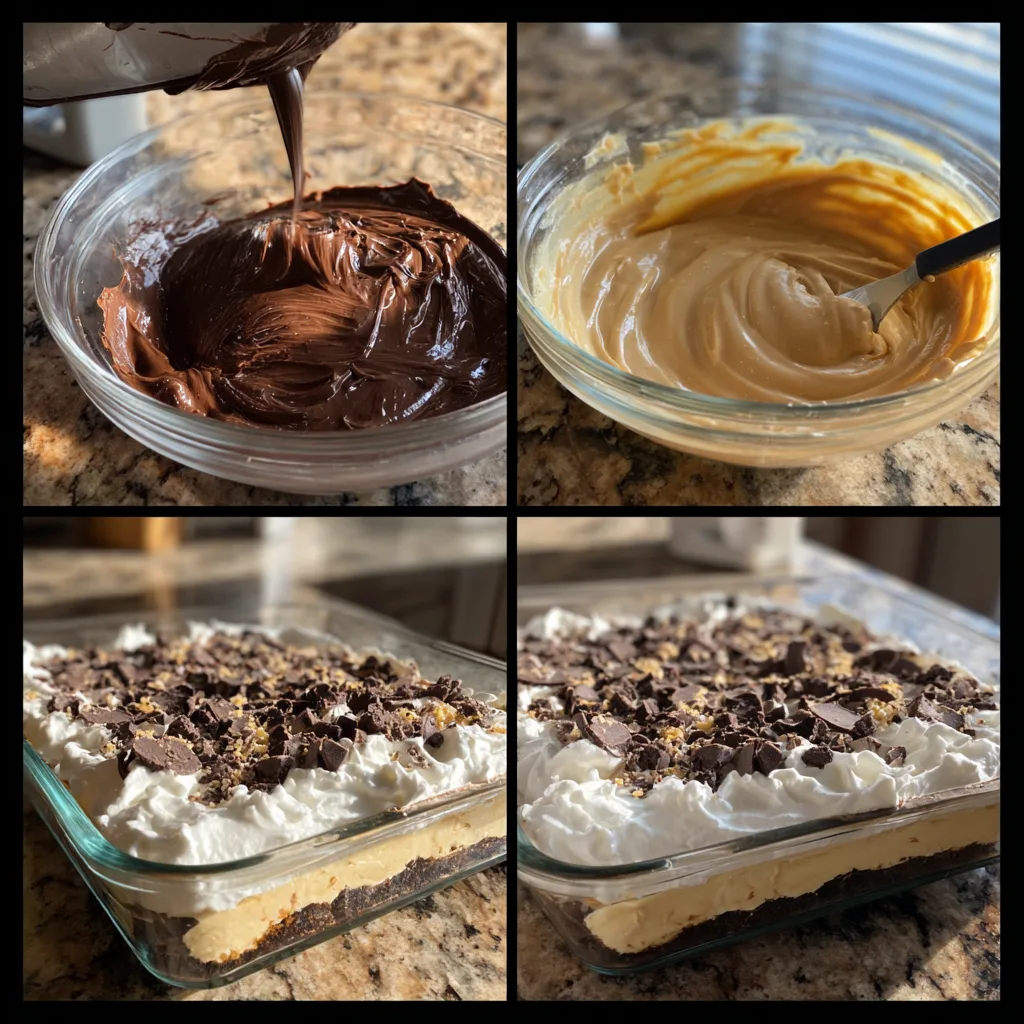
Begin by preparing the cookie crust. Crush the chocolate sandwich cookies into fine crumbs using a food processor or by placing them in a sealed bag and crushing them with a rolling pin.
Transfer the crumbs to a mixing bowl and combine them with melted butter. Stir until the mixture resembles wet sand.
Press the cookie mixture firmly into the bottom of a 9×13-inch baking dish to form an even crust. Place the dish in the refrigerator while preparing the next layer so the crust can firm up.
In a large bowl, beat the cream cheese until smooth. Add the peanut butter and powdered sugar, then mix until the mixture becomes creamy and fully combined.
Fold half of the whipped topping into the peanut butter mixture. Stir gently until the filling becomes light and fluffy.
Spread the peanut butter layer evenly over the chilled cookie crust. Smooth the surface with a spatula.
In another bowl, whisk the instant chocolate pudding mix with cold milk until thickened. Allow the pudding to set for a few minutes before spreading it over the peanut butter layer.
Carefully spread the chocolate pudding over the peanut butter layer, creating another smooth layer.
Top the dessert with the remaining whipped topping and spread it evenly across the surface.
Finish by sprinkling chocolate chips and chopped peanut butter cups on top.
Refrigerate the dessert for at least 4 hours or until the layers are fully set before slicing and serving.
Equipment needed : Must-Have Tools to Get Rolling
Here’s what you’ll want to have on hand:
Silicone Spatula – Durable, heat-resistant silicone spatula perfect for mixing, scraping, and spreading. Gentle on non-stick cookware and easy to clean.
Large pot – You’ll need this to boil the whole cabbage head and soften the leaves.
large bowl –Spacious, durable large bowl ideal for mixing, serving, or food preparation. Made from sturdy material and easy to clean.
Sharp knife – For coring the cabbage and slicing out the thick stem in each leaf. A paring knife works best.
Mixing bowl – A big bowl makes it easier to combine your meat and rice filling evenly.
Cutting board – For prepping cabbage leaves and rolling them like a pro.
Full-Size Blender – is a powerful kitchen appliance for making smoothies, soups, and sauces in large batches.
3-in-1 Air Fryer – This versatile 3-in-1 air fryer offers Air Fry for healthier meals with less oil, Bake for bakery-quality desserts and treats, and Reheat to bring leftovers back to life with crispy, flavorful results
Servings and timing
This recipe makes approximately 12 servings.
Preparation time takes about 20 minutes, while the chilling time required for the dessert to fully set is around 4 hours.
In total, the dessert will be ready in about 4 hours and 20 minutes, most of which is hands-off refrigeration time.
Storage/reheating
This dessert should always be stored in the refrigerator because of its creamy layers. Cover the dish tightly with plastic wrap or store slices in an airtight container.
The dessert will remain fresh in the refrigerator for up to four days.
Freezing is also an option if you want to store it longer. Place slices in a freezer-safe container and freeze for up to one month.
To serve after freezing, allow the dessert to thaw in the refrigerator for several hours until soft enough to slice.
Because this is a chilled dessert, reheating is not necessary.
Variations and Customizations
One of the great things about this chocolate peanut butter lasagna is how easily it can be customized to suit different preferences.
For an extra chocolatey version, you can add a thin layer of chocolate ganache between the peanut butter and pudding layers. This adds richness and creates a more intense chocolate flavor.
If you prefer a slightly lighter dessert, reduced-fat cream cheese and light whipped topping can be used without significantly changing the texture.
Another fun variation is adding crushed pretzels between the layers. The salty crunch pairs beautifully with the sweet chocolate and peanut butter flavors.
You can also experiment with different cookie crusts. Chocolate graham crackers or chocolate wafer cookies work well as alternatives to chocolate sandwich cookies.
For a more decorative presentation, drizzle melted chocolate or peanut butter over the top layer before serving.
Individual servings can also be created by assembling the dessert in small jars or dessert cups. This makes it perfect for parties and gives each guest a perfectly layered personal dessert.
Nutrition and Dietary Info
| Nutrient | Amount per Serving |
|---|---|
| Calories | 430 |
| Protein | 6 g |
| Carbohydrates | 40 g |
| Fat | 28 g |
| Saturated Fat | 13 g |
| Fiber | 2 g |
| Sugar | 28 g |
| Sodium | 290 mg |
Expert Tips & Customizations
Chill the crust before adding layers
Refrigerating the crust helps it firm up and prevents it from crumbling when spreading the filling.
Use creamy peanut butter
Creamy peanut butter creates a smoother filling compared to chunky varieties.
Spread layers gently
Using a spatula and spreading slowly helps keep the layers neat and even.
Allow enough chilling time
Proper chilling ensures the dessert slices cleanly and holds its shape.
Cut with a warm knife
Running a knife under warm water helps create clean, smooth slices.
FAQs
Can I make this dessert ahead of time?
Yes, this dessert is ideal for preparing a day in advance since chilling improves the texture and structure of the layers.
Can I use homemade whipped cream instead of whipped topping?
Yes, freshly whipped cream can replace whipped topping for a more natural flavor.
What type of peanut butter works best?
Creamy peanut butter is recommended because it produces the smoothest filling.
Can I make this dessert gluten-free?
Yes, simply use gluten-free chocolate sandwich cookies for the crust.
How long does this dessert need to chill?
At least four hours of refrigeration is recommended for the layers to set properly.
Can I freeze the entire dessert?
Yes, the dessert can be frozen whole or in slices for up to one month.
Conclusion
No-Bake Chocolate Peanut Butter Lasagna is a rich, indulgent dessert that combines the classic flavors of chocolate and peanut butter in a beautifully layered treat. With its crunchy cookie crust, creamy peanut butter filling, and smooth chocolate pudding layer, every bite offers a perfect balance of textures and flavors.
Because it requires no baking and can be made ahead of time, this dessert is ideal for parties, gatherings, or whenever you want an easy yet impressive sweet treat. Once you try it, this layered dessert is sure to become a favorite for any chocolate and peanut butter lover.
Hungry for more? Visit our website for full recipes and follow us on Pinterest for daily foodie inspo you’ll love to pin!